o
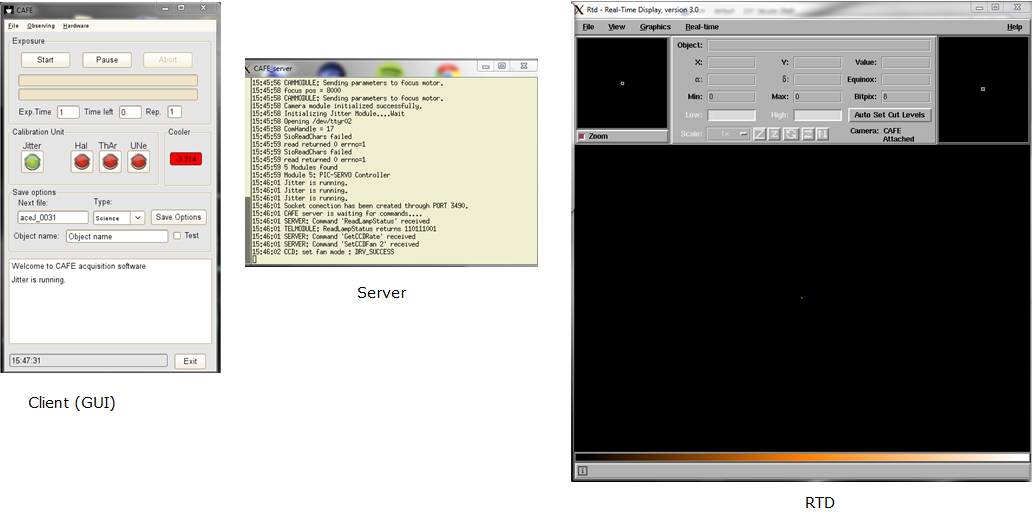
The Graphic user interface (GUI)
o
List of accepted commands by the server
The structure of
the main control software developed for data acquisition of CAFE is based on
three different programs that have to be running simultaneously. The first one
is a server written in C++ that might accept commands trough a port by using
sockets communication (ask staff for details). There are available a list of
accepted commands here.
The second program
is a client. This is written in Python. It simply sends the commands to the
server and wait an answer. It has basically all the
functionalities of the server but every available action are performed through
a very user friendly graphics user interface. This structure allows to any user
to write own clients programs independent of the language used.
The third program
is the Real Time Display (RTD) from ESO. This tool is used to display the
image, make plots, statistics, zooming, change the palette of colors, etc. When
an image is available, the server sends it to the RTD and it display
automatically. More info about RTD can be found at this link http://archive.eso.org/skycat/docs/rtd/
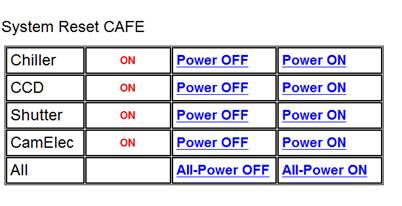
Starting up
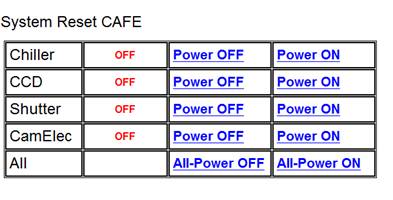
First you have to
log in the machine cafe.caha.es (ask for login and password). Enable the power
on via web by browsing to rescafe.caha.es, as shown in the picture:
There are two
different ways to startup the acquisition software of CAFE:
·
From
any xterm, type start_cafe. This will open the
server, the RTD, and when the server is ready, finally the GUI. The windows
will be opened only if all the processes are executed properly. If a problem
occurs during the initialization, the GUI will not appear. If there is another
session already working, they will be killed by this script.
·
If
the script described above doesn’t work, the system can be initialized in the
next way:
o
Be
sure there is no other session running.
o
Open
a xterm.
o
Change
directory to /disk-a/Software/Server.
o
./CAFE_server. This will initialize the whole system.
o
Wait
until the message “CAFE server is waiting for commands”.
o
Open
another xterm.
o
rtd –camera CAFE –attach &.
o
Change
directory to /disk-a/Software/GUI.
o
python
CAFE.py
You should get
something like this:
By default the CCD
is cooled down to a temperature of -10C when it is initialized. The observer
has to set the CCD temperature to a working value of -90C. To do that:
·
Select
“Instrument” from menu “Hardware”
·
Select
a Final Temp of -90 and click on Set
button. The desired value will be achieved and stabilized, when the temperature
of the cooler becomes in a green color.
·
The
Jitter is automatically turned on during the initialization. The green color of
the button indicates that the motor of this device is really consuming power,
so it guaranties that it’s actually working.
·
Go
Save options and
select a proper setup, indicating the observer name, a data path (use Dir button to browse over the directories), and suffix.
·
Select
the exposure time and the number of repetitions
and click on Start
button.
·
Sequences
can be defined from the menu Observing.
·
NOTE:
Currently the system cannot be paused. This button makes sense actually if more
than one repetition is used. In this case, the system will be paused only
between exposures. This is due to a limitation of the SDKs of the CCD.
The main GUI looks like this:

Exposure
·
Start Button: it will start the sequence o single exposure.
·
Pause Button: It will pause a
sequence, but an exposure is finished.
·
Abort Button: It will abort the exposure. It does not take
any effect during the reading out.
·
Exp. Time: Indicates the exposure time for a single exposure.
·
Time Left: Time left to finish the exposure. Not editable.
·
Rep.: Number of repetitions for a given exposure time.
Calibration unit
·
The
calibration unit comprise of a Jitter, and three calibration lamps. The color
of every button indicates the status of the device. Green means “working”,
yellow means “changing the status”, and red means “disable” .
Depending of the current color, a user mouse click on a button will perform all
the necessary actions to change the status.
·
Jitter: enable or disable the Jitter
·
Hal: enable or disable the halogen lamp. It will perform
all the necessary actions to enable it, as moving the calibration mirror in,
turn the optics and power the lamp on. An adequate exposure time is selected
automatically.
·
ThAr: enable or disable the Thorium-Argon lamp. It will
perform all the necessary actions to enable it, as moving the calibration
mirror in, turn the optics and power the lamp on. An adequate exposure time is
selected automatically.
·
UNe: enable or disable the Uranium-Neon lamp. It will
perform all the necessary actions to enable it, as moving the calibration
mirror in, turn the optics and power the lamp on. An adequate exposure time is
selected automatically.
Save
options
·
Next file: Indicates the next filename. The field is not
editable.
·
Type: Three different options; Science for normal
exposures. Dark option will keep the shutter permanently closed. Fast option
will take a normal exposure but with a very fast readout mode (5Mhz and 6 seconds of readout time). The default readout
mode is 50Khz.
·
Object name: The object name that will appear in the FITS header.
·
Test: This option will generate always the same filename
i.e. test0001.
·
Save options: The observer’s name, data path and the file prefix
can be changed from here.
Console
·
The
console displays all the messages or signals generate by the system. It helps
to identify a problem. PLEASE, read the last messages before report a problems. All these messages are stored at
/disk-a/cafe/CAFE/LOGS/Consoleyymmdd
From the main menu,
there are another two windows that can be opened:
Sequences:
An observing
sequence can be defined here:
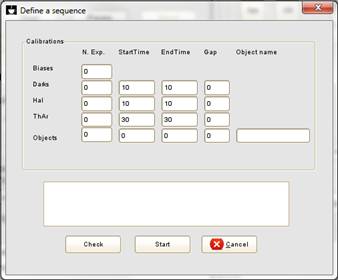
·
N. exp: Number of exposures to be done.
·
Starttime: The initial exposure time of the sequence.
·
EndTTime: The final exposure time of the sequence.
·
Gap: If StartTime and EndTime are different a gap has to be defined. If no
gap is defined, both exposure times has to be the
same.
·
Check button: It will check if all the fields have a right format.
·
Start button: It will start the defined
sequence and will kill this window. If the Sequence has to be interrupted, it
can be done with the abort button from the main window.
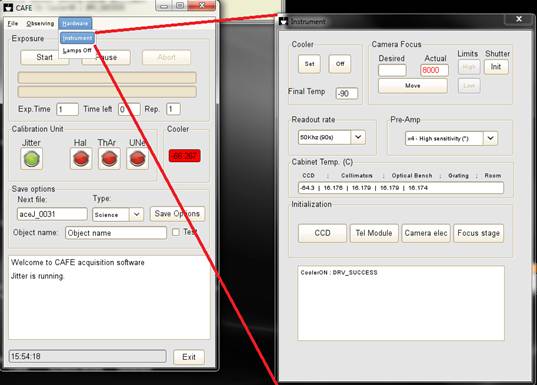
Instrument:
The hardware
instrument can be initialized from this window.
 Cooler:
·
Final Temp: This is the value of the CCD detector to be set.
·
Set Button: It will send the command to the cooler to set the temperature
defined at Final Temp.
·
Off button: It will disable the CCD cooler.
Camera Focus:
·
Desired: This field will contain the motor steps that define
a camera focus position. The values goes from 0 to 12000.
·
Actual: This is the reading of the actual motor position.
The field is not editable.
·
Move button: It will send the command to the focus motor to be moved to the
position defined by Desired.
·
Limits: Two labels indicate the current status of the two
limit switches designed for every end position for this stage. Gray color means
that they are not active, and Red color means that they are.
·
Shutter Init: This will change the status of the shutter.
Readout Rate and Pre-Amp:
·
The
readout mode or the pre-amplifier gain of the CCD can be changed from two combo
boxes. Every time a mode is changed the console will display the basic
characteristics of it.
Cabinet Temp
·
This
field shows the temperatures of all the sensor spread
over CAFÉ, i.e., CCD, Collimator mounts, center of the optical bench, grating
mount, and the room temperature outside the cabinet. All these numbers are
stored in the FITS header. The historic log with all the data are store at
/disk-a/cafe/CAFE/LOGS/Temperatureyymmdd.
Initialization:
·
If
a problem occurs, the electronics can be initialized :
·
CCD button: it will re-initialize the CCD.
·
Tel Module: It will re-initialize the motor stages and will find
the home position.
·
Camera elec: It will re-initialize the camera electronics board.
·
Focus stage: This will find the lower limit switch of the focus
stage. DUE TO THE HYSTERESIS OF THIS STAGE, this has to be done if it is
strictly necessary.
There is a
procedure to shut the system down. If the CCD temperature is below -20C, it has
to be warm up to a safe value over -20C prior to disconnect the camera. This
will avoid thermal stress in the detector. Moreover, all the electronics
boards, has to be disconnected to free the corresponding serial ports. All these task are done by clicking the “Exit” button from
the main window. Due to the warming up procedure, the shutdown can take some
minutes. The procedure finished by
killing all the GUIs, RTD and stopping the server.
At the end of every
run, the system has to be powered off through rescafe.caha.es
Starting up:
During the starting
procedure, some problems may occurs as shutter problems (see troubleshooting) . This check list is proposed to make some tests to
1.
Follows
the steps explained above for the starting up.
2.
Take
a Dark frame and check that the average value is around 850 counts and the
standard deviation is around 2.5-3.0 counts.
3.
Click
on Hal lamp and take a frame. The intensity of the brightest orders has to be
between 10000-15000 counts for the proposed exposure time.
4.
Take
a ThAr frame with the proposed exposure time. Check FWHM of the spots. It has
to be between 2.0 and 2.3 pixels around the image. If higher values are
obtained, the spectrograph is defocused (see troubleshooting).
This is a list of
the most common problems that may happen with CAFE. Anyway, please, before
report a problem, read carefully the
last messages of the console. It normally gives a clear idea of what’s
going on.
Diagnostic: The routine
start_cafe does not open the main graphics user interface.
Explanation: An error occurs during the initialization.
Solution: try to open manually as indicate in the section starting
up.
Diagnostic: During the
initialization, the server stops at “Openning ttyr0”.
Explanation: Cannot communicate with the electronics of the
telescope module
Solution: Check that the telescope module is properly powered on and well
connected to CAHA network.
Diagnostic: During the
Initialization, the server disappears or gives a message of segmentation fault.
Explanation: A fatal error occurs during the initialization, and
the system cannot be started up.
Solution: Check that the CCD has been powered on. Normally this can happen if
the initialization of the CCD has failed.
Diagnostic: When a
calibration lamp is pressed, the console displays a message “Lamp is NOT ready”.
Explanation: When a lamp is pressed, the system checks the
current position of the calibration mirror or optics. If any of those are not
in the proper position, the lamp will not be ready because the light is not
going to the fiber.
Solution: Go to the Instrument GUI, and press “Tel Module”. This will find the
home position for the calibration unit.
Diagnostic: The label of
the CCD temperature is in RED color.
Explanation: The CCD temperature is not stable yet. It normally
takes some minutes, before getting in green color.
Solution: Go Instrument GUI and press “Set” button on the cooler box.
Diagnostic: Darks looks
to have signal/structure and halogen frames looks very faint.
Explanation: The shutter is working in a wrong way. It is being
closed during the exposure and opened during reading out. The shutter of CAFE
is working in a bi-stable mode. It is controlled by a single TTL signal that
open or close it. The device cannot distinguish between a signal to open or
close. So the system will know how to open or close by remembering the last
status of the shutter. If by any reason the sequence is upset, any new exposure
will be wrong.
Solution: Go Instrument GUI and press “Init” in the Shutter box. This will
change the current status of the shutter.
Diagnostic: The FWHMs of
the ThAr spots are bigger than 2.5 pixels in the X-axis.
Explanation: The spectrograph is defocused.
Solution: The focus stage has a very big hysteresis but it works well if always
goes in one direction. So:
·
Go
to instrument GUI, and press “Focus stage”. This will initialize the focus
stage and will set to zero.
·
Send
the focus value to an smaller value than the expected
one (the normal value is around 8000, so 7000 is a good starting point).
·
Take
a ThAr exposure and check the FWHM at different locations of the image.
·
Move
small focus steps about 200 and take again a new image until a value of 2.0 to
2.3 is achieved.
·
IMPORTANT
NOTE. If during this procedure you pass away the proper value, move the focus
back is not right due to the hysteresis explained above. Then, re initialize
again the focus stage and move to the absolute value you found first. NEVER
move back relative steps!, because they will never reproduce the absolute
values
There some
additional software that must be installed at the local machine in advance:
For the server is
needed:
·
IKON-L
driver from Andor Technologies
·
SDKs
from Andor Technologies
·
G++
and gcc compilers
·
CFITSIO
·
Real
Time Display (RTD) from ESO
For the client is
needed:
·
Python
2.6 or newer.
·
Boa
constructor (optional, this is for an easy GUI design)